
![]()
Focus Inventory Setup
Perform the initial inventory configuration
Create and Configure your Vendors
Inventory units are used to give easy to read names to your inventory calculations, units could be anything from BTL for Bottle, to Case,
- Configure Vendors
- Go to Inventory -> Vendors
- Input your vendors into the software
- Inputting your vendors into Focus will enable you to run Inventory reports against specific vendors. This will allow you to place your orders easier and allow you to input your received product easier.
Create and Configure Inventory Groups
Inventory units are used to give easy to read names to your inventory calculations, units could be anything from BTL for Bottle, to Case,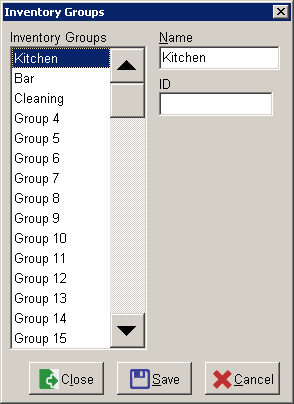
- Configure Inventory Groups
- Go to Inventory -> Groups
- Input the inventory groups that you would like to use.
- An inventory group is typically a large container of sub-groups. Typical inventory groups are the type of product sold (FOOD, BAR), some users will set it as the location of product (PANTRY, WALK-IN, FREEZER).
- In addition to being able to run reports against these groups, defining them will allow you to organize your inventory for ease of count.
Create and Configure Inventory Subgroups
Inventory units are used to give easy to read names to your inventory calculations, units could be anything from BTL for Bottle, to Case,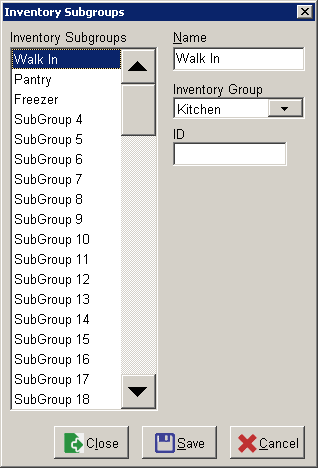
- Configure Subgroups
- Go to Inventory -> Subgroups
- Input the names and corresponding groups that you are going to use.
- An inventory subgroup is a further delineation of your inventory groups. Common subgroups would be:
DOMESTIC BEER with an Inventory Group of BAR
MEAT with an Inventory Group of WALK-IN
Create and Configure Inventory Units
Inventory units are used to give easy to read names to your inventory calculations, units could be anything from BTL for Bottle, to Case,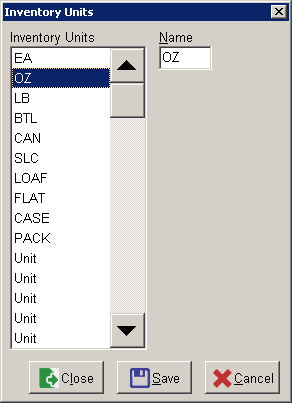
- Configure Units
- Example:
When you order Bud Light, you order by the case. So CASE will be a unit. When you count the Bud Light, you may count by six-pack. So 6PK will be a unit. Lastly when you sell Bud Light, you will likely sell it by the bottle. So BTL will be a unit.
- Example:
- Go to Inventory -> Units
- Input the units of measurement that you will be using in your recipes, stock units and purchase units.
- You will use these units of measurement to define how you sell product, how you stock (and count) product and how you order product.
- It is recommended that you define as many of your measurement units now to ease the inputting of Inventory Items in step 6.
Create and Configure Inventory Items (Ingredients)
Ingredients are the basis for your FOCUS Inventory system. You can choose to track as many or as few of your ingredients as you'd like. Our recommendation is to only track higher value, important ingredients. Tracking inconsequential ingredients (such as bay leaves, pepper or similar items) will take a lot of time, and probably not produce profitable results.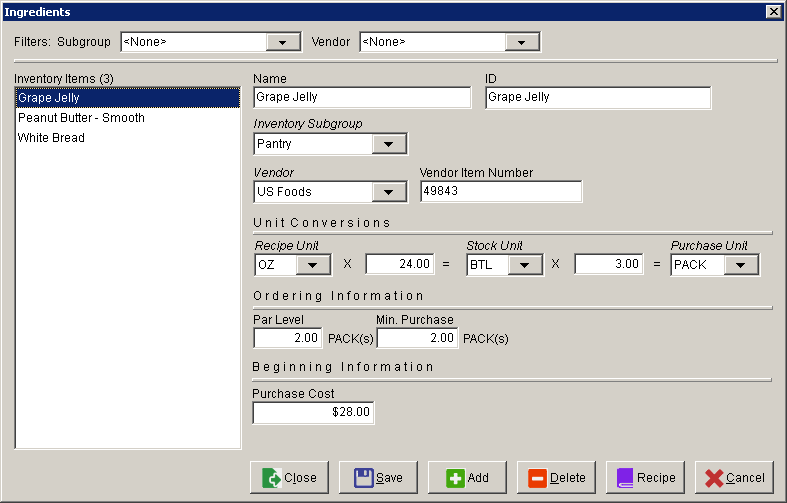
- Create Inventory Items (Ingredients)
- Filters: Subgroup
- Filters: Vendor
- If you intend to follow along with the rest of this guide, let’s input some of the items that we are going to reference in step 7.
- This is where you specify the applicable inventory subgroup for this particular item
- EX: Domestic Beer
- The inventory items screen is one of the major components of Focus Inventory. Here, you will input the items that will allow you will be tracking. This is also the screen where you will input the items that will eventually define your recipes.
- We are going to first identify each of the fields starting from the top. For the purposes of this guide, we will use Bud Light as an example
- Filters: Subgroup
- This drop down allows you to filter the Inventory Items by Subgroup
- Filters: Vendor
- This drop down will allow you to filter the Inventory Items by applicable Vendor
- Inventory Items
- This window will show all of your inventory items.
- Name
- This is the name of the inventory item
- EX: Bud Light
- ID
- This in your unique ID for the inventory items.
- Each item should have a unique ID
- The Name and ID do not have to be different.
- This field is not required
- EX: Bud Light
- Inventory Subgroup
- This is where you specify the applicable inventory subgroup for this particular item
- EX: Domestic Beer
- Vendor
- Here you will specify the applicable vendor for the item
- EX: Anheuser-Busch
- Vendor Item Number
- Here you can specify your vendor’s item number.
- This is useful for your reorder report.
- 100001
- Unit Conversions
- Each inventory item will have its applicable units defined here
- Sale unit
- This is how you sell an item.
- EX: BTL
- Sale unit multiplier
- This is how many sale units are in a stock unit
- EX: 6
- Stock Unit
- This is how you count an item during your weekly or monthly inventory.
- EX: 6PK
- Stock unit multiplier
- This is how many stock units are in a purchase unit
- EX: 4
- Purchase Unit
- This is how you order/purchase the item from your vendor
- EX: CASE
- Sale unit
- Ordering Information
- Par Level
- A Par Level is the minimum number of units that you want to have on hand.
- You specify Par level by stock unit.
- The data in this field is used for the Par Report and the Ordering Report.
- Min. Purchase
- The Min. Purchase field allows you to specify what the minimum number of purchase units you need to place with your vendor.
- This is used for the Ordering Report.
- Par Level
- Beginning Information
- In this field, you will specify your most recent purchase cost.
- You will specify this number by cost of a purchase unit. Focus will do the math to bring you down to the sale unit.
- This number is updated automatically when you receive your Invoices into Focus using the Invoice function.
- Each inventory item will have its applicable units defined here
- Filters: Subgroup
- If you intend to follow along with the rest of this guide, let’s input some of the items that we are going to reference in step 7.
- Peanut Butter
- Name: Peanut Butter
- ID: BLANK
- Inventory subgroup: Kitchen
- Vendor: Sysco (you may choose any vendor you would like)
- Vendor Item Number: 143314 (you may enter any number you would like)
- Recipe Unit: OZ
- Recipe Unit Multiplier: 32
- Stock Unit: QT
- Stock Unit Multiplier: 1
- Purchase Unit: QT
- Purchase Cost: $4.52
- Grape Jelly
- Name: Grape Jelly
- ID: BLANK
- Inventory subgroup: Kitchen
- Vendor: Sysco (you may choose any vendor you would like)
- Vendor Item Number: 573756 (you may enter any number you would like)
- Recipe Unit: OZ
- Recipe Unit Multiplier: 32
- Stock Unit: QT
- Stock Unit Multiplier: 1
- Purchase Unit: QT
- Purchase Cost: $6.85
- Bread Slice
- Name: Bread Slice
- ID: BLANK
- Vendor: Sysco (you may choose any vendor you would like)
- Vendor Item Number: 88228 (you may enter any number you would like)
- Recipe Unit: Slic
- Recipe Unit Multiplier: 24
- Stock Unit: Loaf
- Stock Unit Multiplier: 4
- Purchase Unit: Flat
- Purchase Cost: $4.13
- Peanut Butter
- We are going to first identify each of the fields starting from the top. For the purposes of this guide, we will use Bud Light as an example
Attach recipes to your Menu Items
Menu Items are what your employees ring up in FOCUS. Now that you've created your Ingredients, it's time to attach those Ingredients to the Menu Items via the Recipes tab.

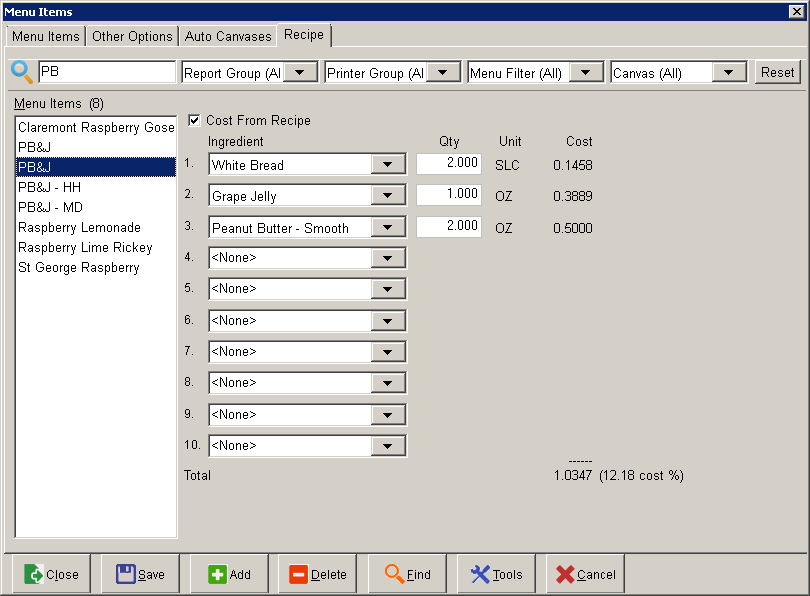
- Build your recipes
- First we are going to check Cost from Recipe this will allow Focus to populate the PB&J’s food cost based upon the recipe we enter.
- Next we are going to select the recipe ingredients.
- As you can see, Focus will display the sale unit of OZ along with the corresponding cost.
- In this case, we are going to specify Peanut Butter with quantity of 2.
- Now specify Grape Jelly with a quantity of 1 OZ.
- Lastly, specify Bread Slice with a quantity of 2 SLC
- Note: if your recipes require more than 10 ingredients, you can build sub-recipes as inventory items. Just go back to your inventory items and press the recipes button at the bottom to build a sub-recipe.
- Example, your Turkey & Ham Panini consists of 2 slices of turkey, 2 slices of ham, 1 slice of cheese, 2 slices of tomato, 2 slices of bread, one leaf of romaine lettuce and 2 OZ of garlic aioli. The garlic aioli consists of 5 ingredients. You would build the garlic aioli as an inventory item with a recipe attached to it.
- This is perhaps the most important part of the inventory setup. Accuracy at this stage is the key to a successful inventory deployment.
- Go to Menu -> Menu Items
- Select the Recipe tab
- Here is where you will select the applicable inventory items that make up your menu items
- For the purposes of this guide, we will use a peanut butter & jelly sandwich as the example
- Once you have entered the ingredients of the PB&J, you’ll see that the total shows your food cost and corresponding cost vs. sale percentage.
- Now go ahead and build each of your recipes for the items that you want to track.
Create Inventory Worksheets
In order to enter your weekly and monthly inventories, you will need to have an inventory worksheet. You can create multiple Inventory Worksheets, based on Vendor, Item or Inventory Subgroup. Use several worksheets to make your data entry easier.
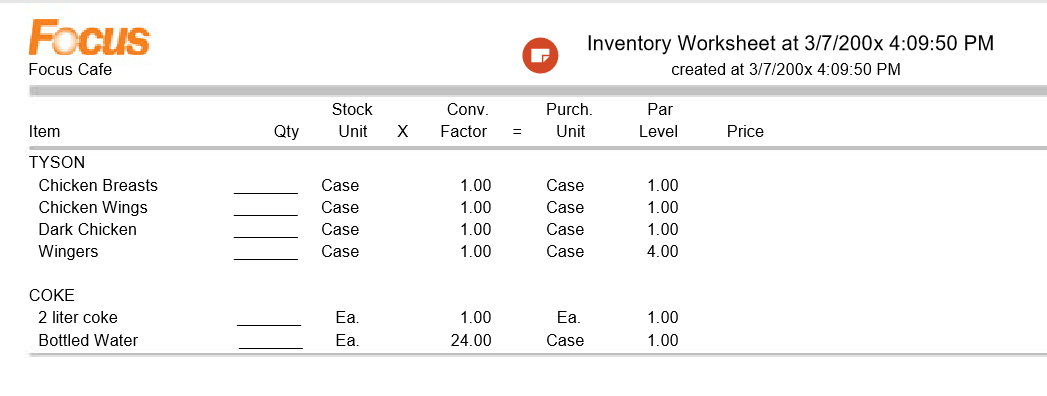
- An inventory worksheet is a report that provides you with a physical worksheet for conducting your inventory.
- Go to Reports -> Setup and find an open (unused) report
- Name the report
- EX: Inventory Kitchen
- Set the Type as Inventory Worksheet Report
- Sort
- Here you can choose to sort by vendor, subgroup or item name
- Page Break
- Checking this box will allow Focus to insert a page break after each vendor or subgroup.
- This is useful for keeping your worksheets organized
- Vendors/Subgroups
- Depending on your selection under Sort, you’ll either see your vendors listed here or your subgroups. Select which vendors/subgroups you would like displayed on this worksheet.
- Under Inventory Report Options you can specify how you want the report to return data.
- Click on Output to go to the report output screen
- Set the report to Display On Screen and set the report to a security code which you are permitted to see.
- When finished, you may create additional Inventory Worksheet Reports.
Input your starting Inventory
Now that you have built the backbone of your inventory system, you’ll need to enter your beginning inventory into Focus.
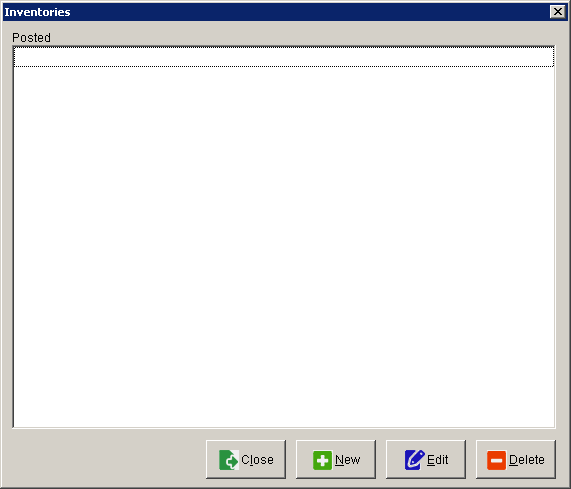
New inventory window

Select an Inventory Worksheet
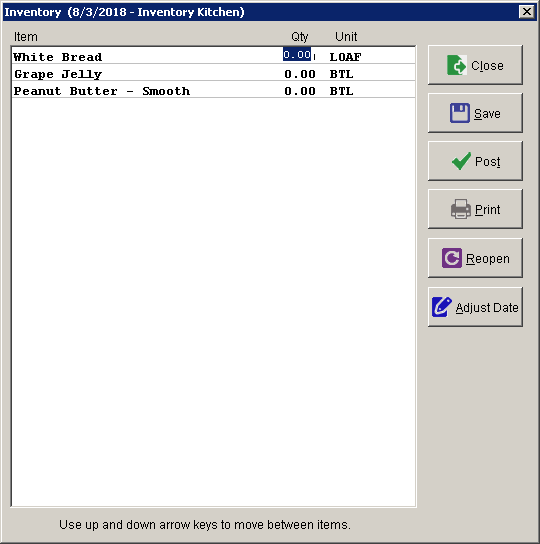
Inventory count entry screen
- From your FOCUS Setup Dashboard press the Inventories button.
- Press New to start a new inventory count.
- Select the Inventory Worksheet that you would like to use and select the date that you will be posting the inventory, press Create
- You will now see your Inventory entry screen
- Double click in the Qty field to enter the quantity on hand
- When finished, press Save.
- Once you have verified your information is correct press Post.
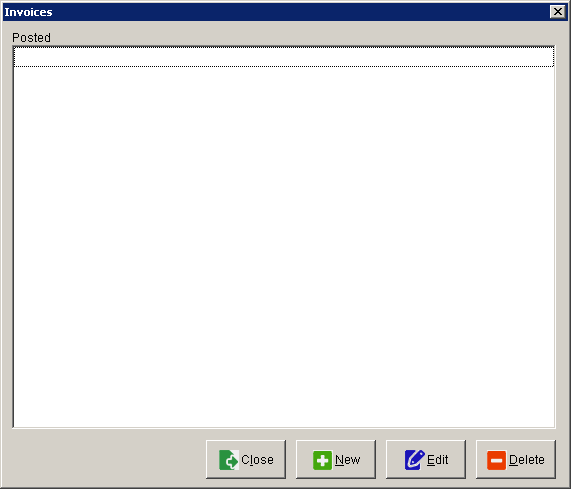
Input received Vendor Invoices
You now understand how to enter your starting inventory; the next step will be inputting your daily or weekly incoming product.
New Invoice window

Inventory Worksheet selection window

Invoice entry screen
- From your Back Office Dashboard press the Invoices button.
- Press New to start a new invoice entry
- Select the Inventory Worksheet that corresponds to the items that you have received.
- Note in the example above, the "Sysco Foods" worksheet has been selected. In the resulting Invoice entry screen, only items where "Sysco Foods" is the vendor are shown.
- You will now see the Invoice entry screen.
- On the left, you’ll see each item that corresponds to the Inventory Worksheet that you selected in step 10.d
- Double-click the inventory item that you have received. They will be moved into the Received Item screen
- Now, enter the quantity received.
- You can also adjust the product price, if it has changed.
- If you update the price, the price change will carry all the way through Focus and modify your food cost appropriately.
- Once you have entered all of your received items, you’ll now press Save.
- Once you’ve verified that your data is correct, press Post to store your data.
Running Inventory Reports
You have now gone through the process of building your inventory backbone. You’ve also learned how to enter weekly inventories and how to enter invoices for product that you have received. The next step is running your inventory reports.
Some sample inventory reports are available here: FOCUS Inventory Sample Reports
- You’re predominately going to run 5 reports using your Focus Inventory data.
- This report will show you what you started with, what you have sold, what you have received and what you should have on hand. Under ideal circumstances, your projected ending inventory will match your actual on-hand inventory. However, that seldom happens. Instead, you’ll have a variance.
- This is the principal report that you will use for counting your stock.
- Inventory On-Hand Report
- This report will show you what you should expect to have on hand. It will take your beginning inventory, plus any purchases and subtract your quantity sold to give you an expected on-hand quantity.
- Inventory Production Report
- This report is designed to be run for a time frame, giving you an idea of what items you need to have prepared. This report will breakdown the specified ingredient by interval (minutes in the day) and show you the previous dates along with an average.
- Inventory Reorder Report
- This report will allow you to see exactly what you need to order from a particular vendor, based upon your par levels.
- Note: these are sample reports and may not reflect your specific data.
- Inventory Usage Analysis Report
- Inventory Worksheet Report
- If you need any assistance with these reports, please contact the FOCUS Helpdesk Here: Submit Helpdesk Request
Comments
0 comments
Please sign in to leave a comment.